Butler Banana Bread (with a Brown Butter Edit!)
The First Recipe I Ever Made By Myself
I’m not someone who claims to be a fabulous chef by any means. For the first seven years of my relationship, it was my husband who did the majority of the cooking. I’ve had to work at cooking the same way I’ve had to work at learning how to be a teacher. Over the past ten years or so, I’ve made an effort to learn recipes I’ve found on Pinterest and keep track of the dishes I feel I’m starting to improve at with practice. Sometimes, the things that matter most take time to learn.
I do remember one recipe I used to make when I was 15 years old. I would watch my mom bake this bread, then write down the recipe for my own use. I’ve kept that same recipe card all these years. Now, whenever I’m feeling a bit nostalgic, I’ll make banana bread—the Butler way.
Feel free to pin the image below, which shows the ingredients and directions side by side. Then, brew yourself a cup of coffee or tea and make banana bread today’s family snack.
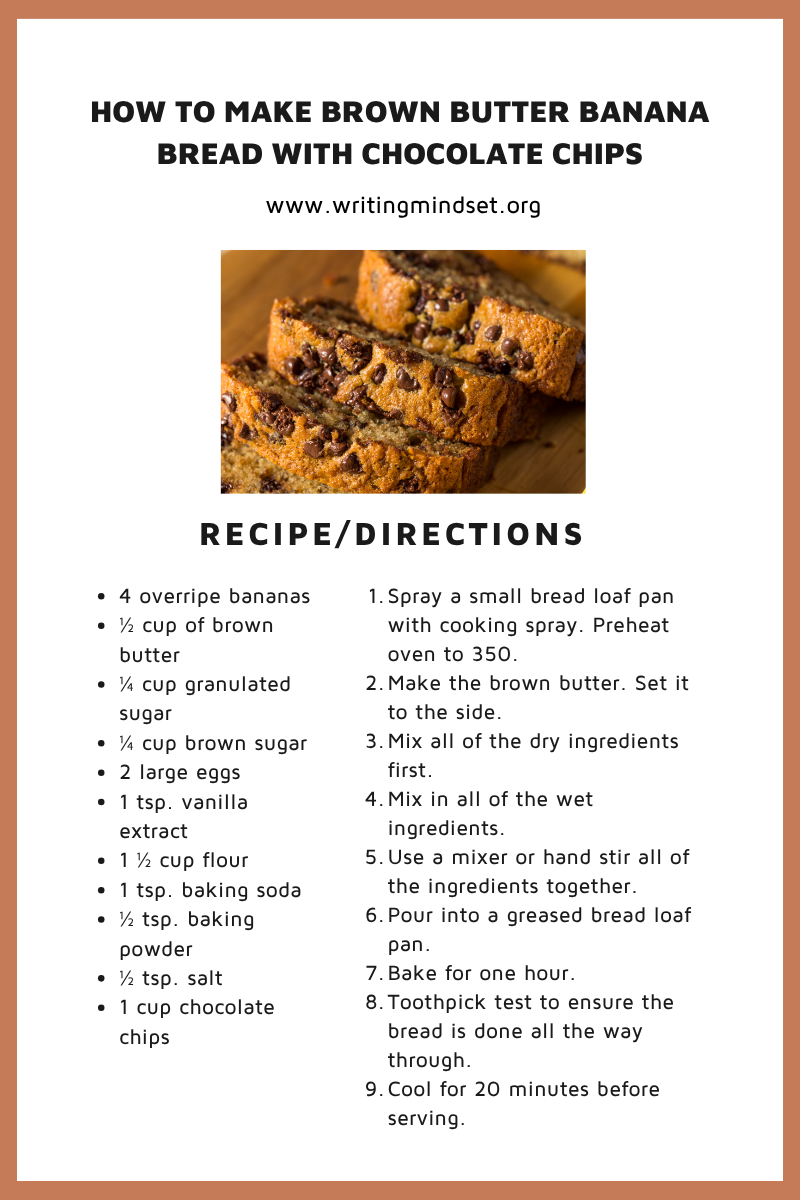
Update: A Delicious Twist – Brown Butter Banana Bread with Chocolate Chips
If you're in the mood for something a little more decadent, I recently tried an updated version of this classic recipe—and wow, it's a keeper! This version uses brown butter to add a rich, nutty flavor and includes chocolate chips for that perfect sweet bite in every slice. The brown butter gives the bread a deeper, caramel-like taste, while the chocolate chips make it a fun treat for kids and adults alike. It still has that comforting banana bread base, but with a gourmet upgrade. My family loved it!
Whether you’re sticking with the original or giving the brown butter version a try, you really can’t go wrong.
Happy baking and writing!
Original Banana Bread Recipe


Step-By-Step Directions
Step 1: Assemble your ingredients! Preheat the oven to 350.
Grab everything you need! I feel like I don’t use a ton of baking soda, so I always grab a new box when I make banana bread. The new box heads to the fridge when I am done to absorb any extra smells. The recipe calls for a pound of bananas, but a good rule of thumb is to use 3-4 over-ripe bananas. My local grocery store sells ripe bananas, but you could just let some bananas ripen on the counter over a week or so.

Step 2: Mix all of the dry ingredients together.
Flour check, brown sugar check, salt check, baking soda, check! I like to use dark brown sugar, but you can use regular brown sugar for this recipe. You could also substitute out the flour for gluten-free flour if you are looking to modify the recipe for gluten-free banana bread lovers.

Step 3: Add in the wet ingredients.
I like to melt the margarine before I add it into the dry mixture to help with bringing everything together. A bit of advice is to melt the margarine at 20 second intervals in the microwave or cover the dish with a paper towel. I always cause a margarine explosion in the microwave. The bright side of this is that the microwave gets cleaned every time I cook banana bread. I also like to mush the bananas with clean hands when I am adding them into the mixture.

Step 4: Mix everything together.
If you have an electric mixer, go for that. I prefer to hand mash the banana bread because I like the chunks of banana in the bread after it cools. If you are a person who likes to grab a warm slice of bread fresh from the oven, use the mixer. Until the bread cools, it might be a tad mushy with the bigger chunks of banana. You could also add in a little vanilla extract if you like a little sweeter flavor in your banana bread.

Step 5: Pour into a greased loaf pan. Bake for one hour.
I always test the baked bread with a toothpick before pulling it from the oven. Give it 5-10 more minutes if your toothpick comes up sticky and the bread needs more time to cook. There should be a hard crust on the top of the bread that is cracked open when it is ready to come out of the oven.


Updated Brown Buttler Banana Bread with Chocolate Chips
I was reading Magnolia Journal, and it included all sorts of uses and recipes with brown butter. I had never used or made brown butter to accompany anything, but, like cooking a good roux, I was curious to see if it would add some flavor to a favorite family treat.
How to Make Brown Butter (a.k.a. Liquid Gold)
You’ll Need:
Unsalted butter (use the amount your recipe calls for)
A light-colored saucepan (so you can see the color change)
A heat-proof spatula or whisk
1. Cut the Butter
Cut your butter into evenly sized chunks. This helps it melt evenly and prevents scorching.
2. Melt Over Medium Heat
Place the butter in your saucepan and set it over medium heat. Let it melt completely, stirring occasionally.
3. Watch It Foam
Once melted, the butter will begin to foam as the water content evaporates. Keep stirring gently.
4. Listen & Smell
After a minute or two, you’ll hear a soft crackling and start to smell a nutty aroma. That’s the milk solids beginning to brown.
5. Look for Color Change
Stir constantly and watch closely. The milk solids will turn from pale yellow → golden → deep amber. Once you see little brown specks forming on the bottom and the butter has a warm, toasty smell, it’s ready. ⚠️ Tip: This happens quickly—don’t walk away! It can burn in seconds.
6. Remove from Heat Immediately
As soon as it’s golden brown, remove the pan from the heat to stop the cooking process.