
Unlocking a Fresh Start: How to Effortlessly Move Your Bullet Journal to a New Notebook
A Step-by-Step Guide to Migrating Your Bullet Journal to a New Notebook
New notebooks may be a form of journal lovers’ addiction. There is nothing like a new notebook to make you feel like you can conquer the world or take on a new project. A new notebook purchase would logically take place when one notebook is filled up and can’t be used any longer. If you are an avid journal lover; however, you will often find yourself making up a new reason to jump into a new notebook.

Whatever form of journaling you use, I find that most people who carry some form of an everyday notebook or journal or more likely to need to move over to a new notebook for whatever reason. This journal could be a planner, feelings journal, diary, or bullet journal. Bullet journaling has become an incredibly popular method for organizing your life, tracking goals, and unleashing your creativity. However, there may come a time when you need to move your bullet journal or just your everyday journal from one notebook to another. Whether you've filled up your current journal or simply want to switch to a new one, this step-by-step guide will walk you through the process of migrating your bullet journal seamlessly.
Journal Migration Steps
For the sake of this post, I am going to walk through my current journal migration from my Archer & Olive Sun Frame Dot Grid B5 journal into my new Archer & Olive Brown Art Deco Traveler’s Notebook.
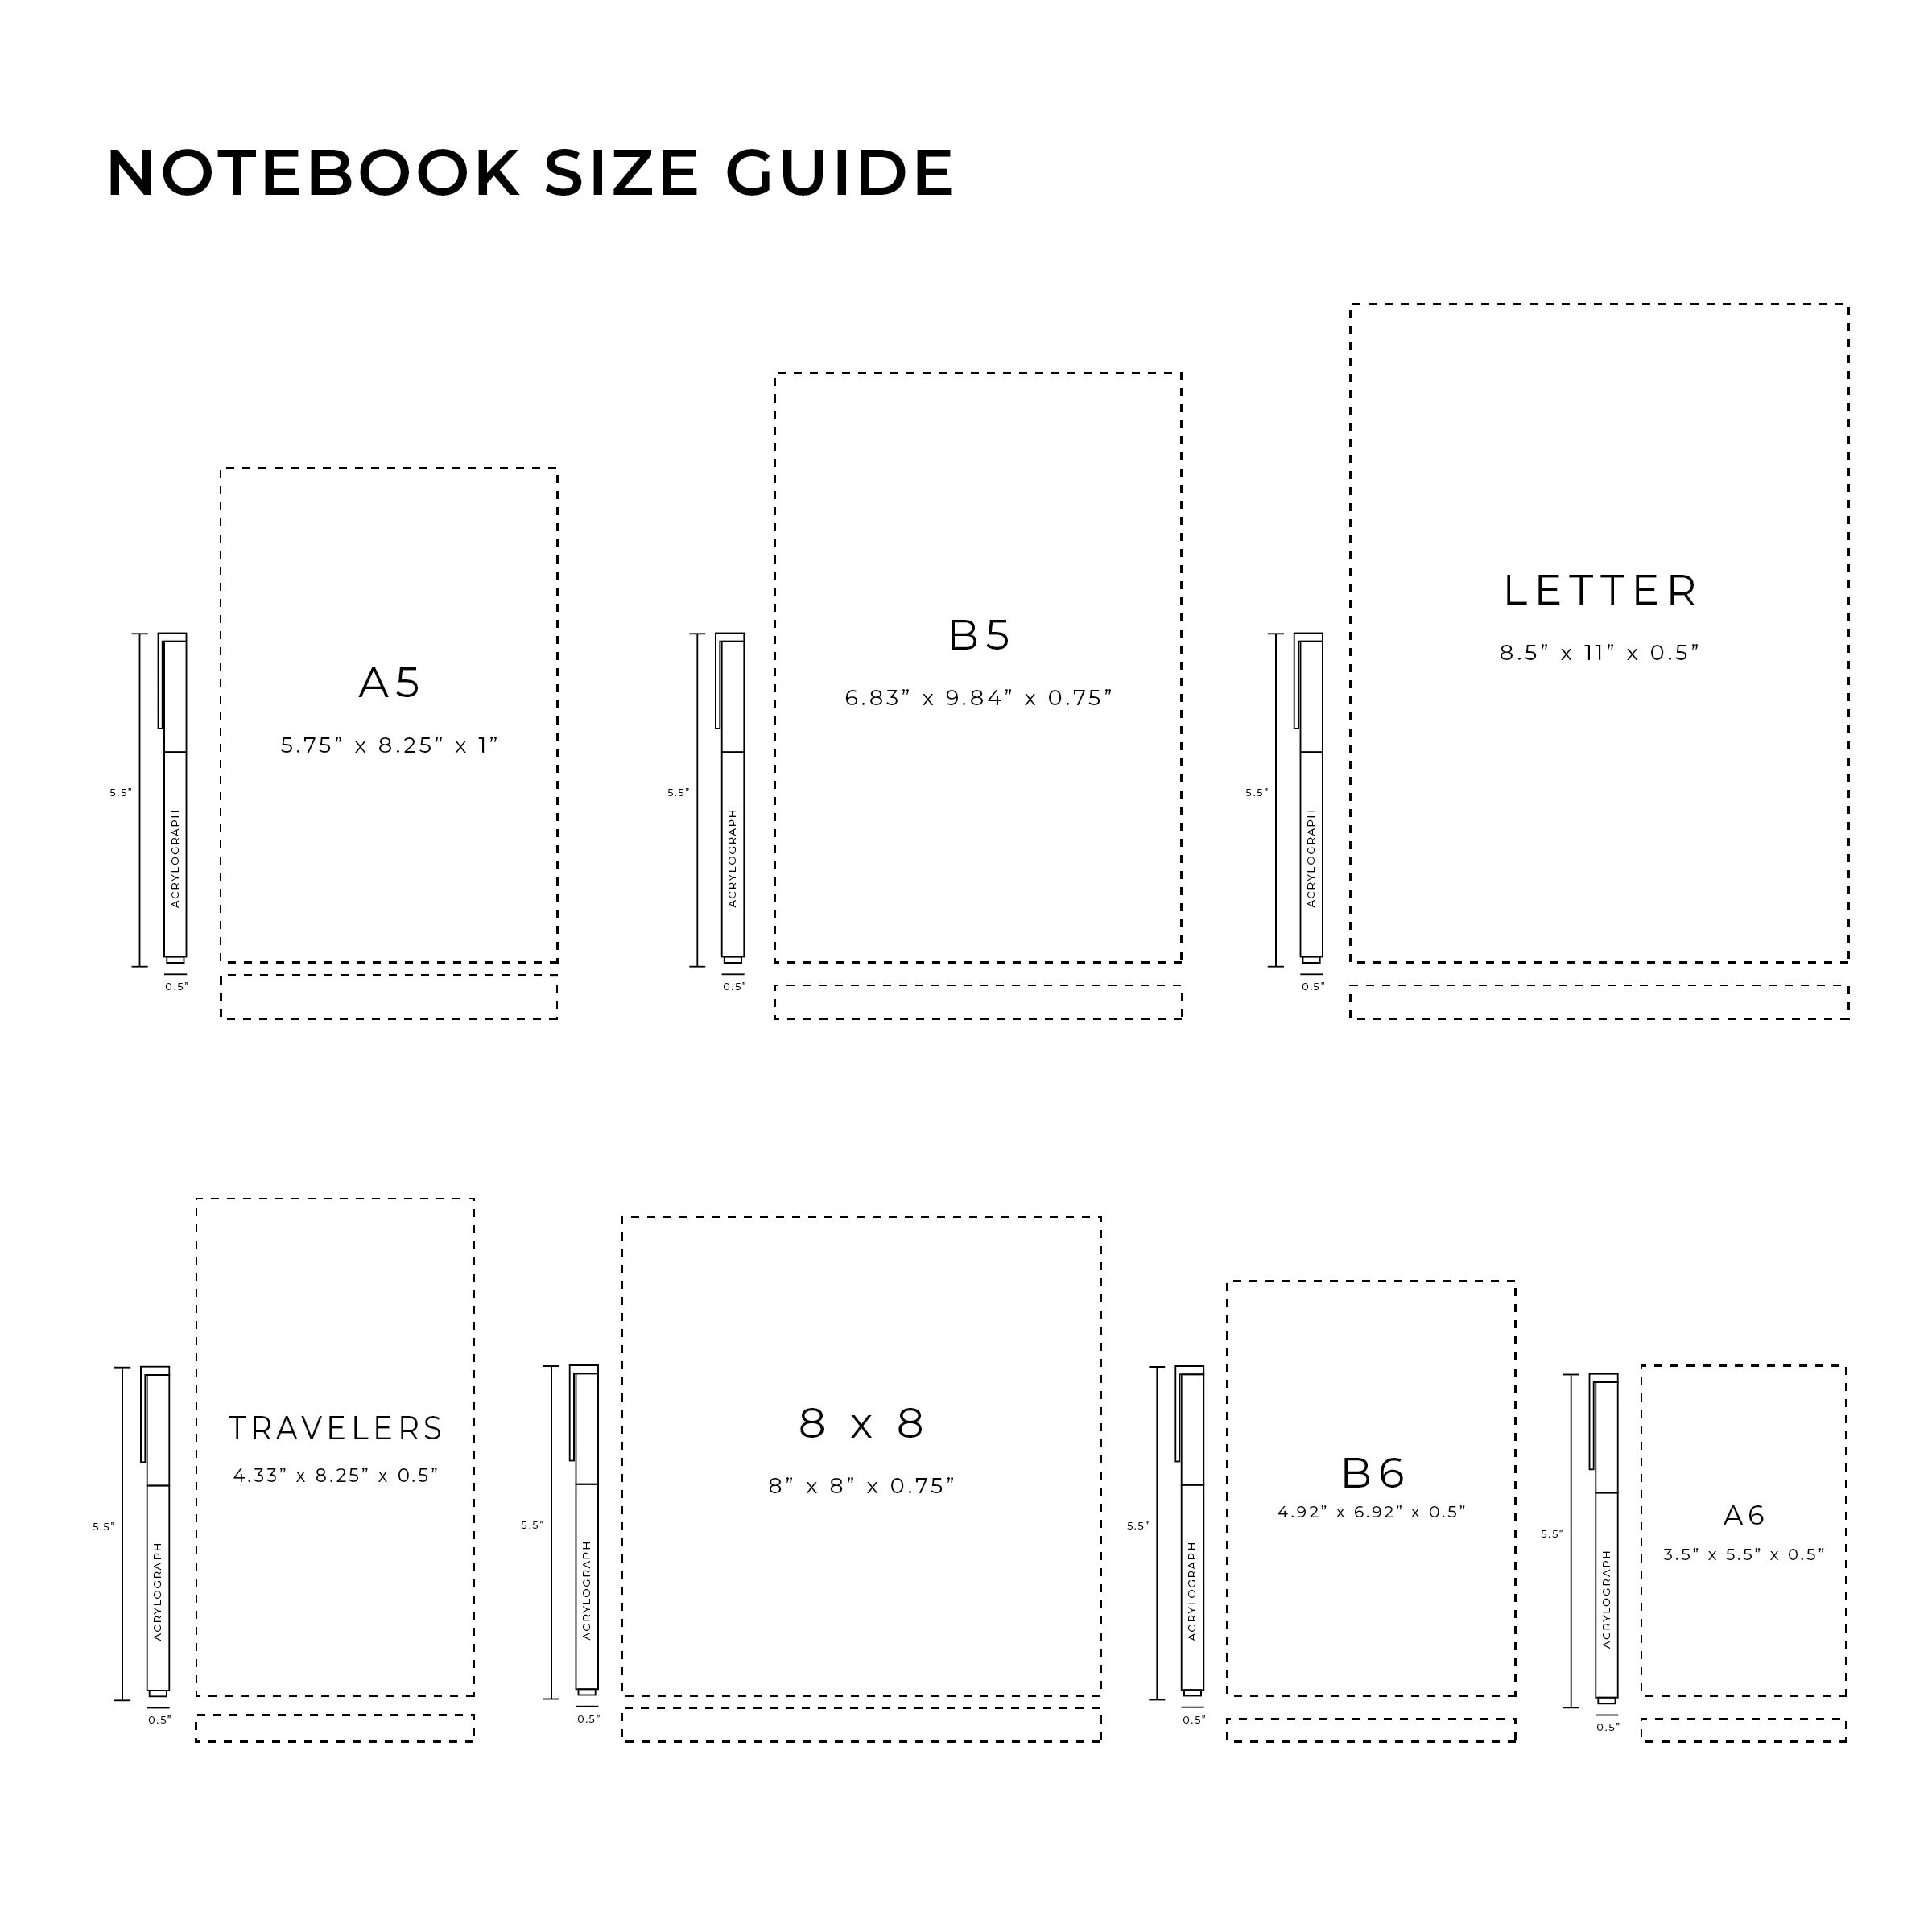
Archer & Olive Size Grid for reference. Click on the image to visit the Archer & Olive site!
I move into new notebooks for a lot of reasons. I always assess how I am using a notebook or journal, and I always notice if I haven’t been using a notebook or journal to the best of my ability. For the current move over, I noticed that I have not been carrying my journal around with me as much as possible. I have found myself getting stuck because I have so many ideas buzzing around my head or want to write down an idea for later and my notebook is at home. This led me to want to migrate into a smaller notebook that is more lightweight and easier to toss into any bag. My B5 notebook fit easily into my toddler’s backpack or my smaller backpack that I take on the go, but the more that I used it I found that it was getting heavier and heavier.

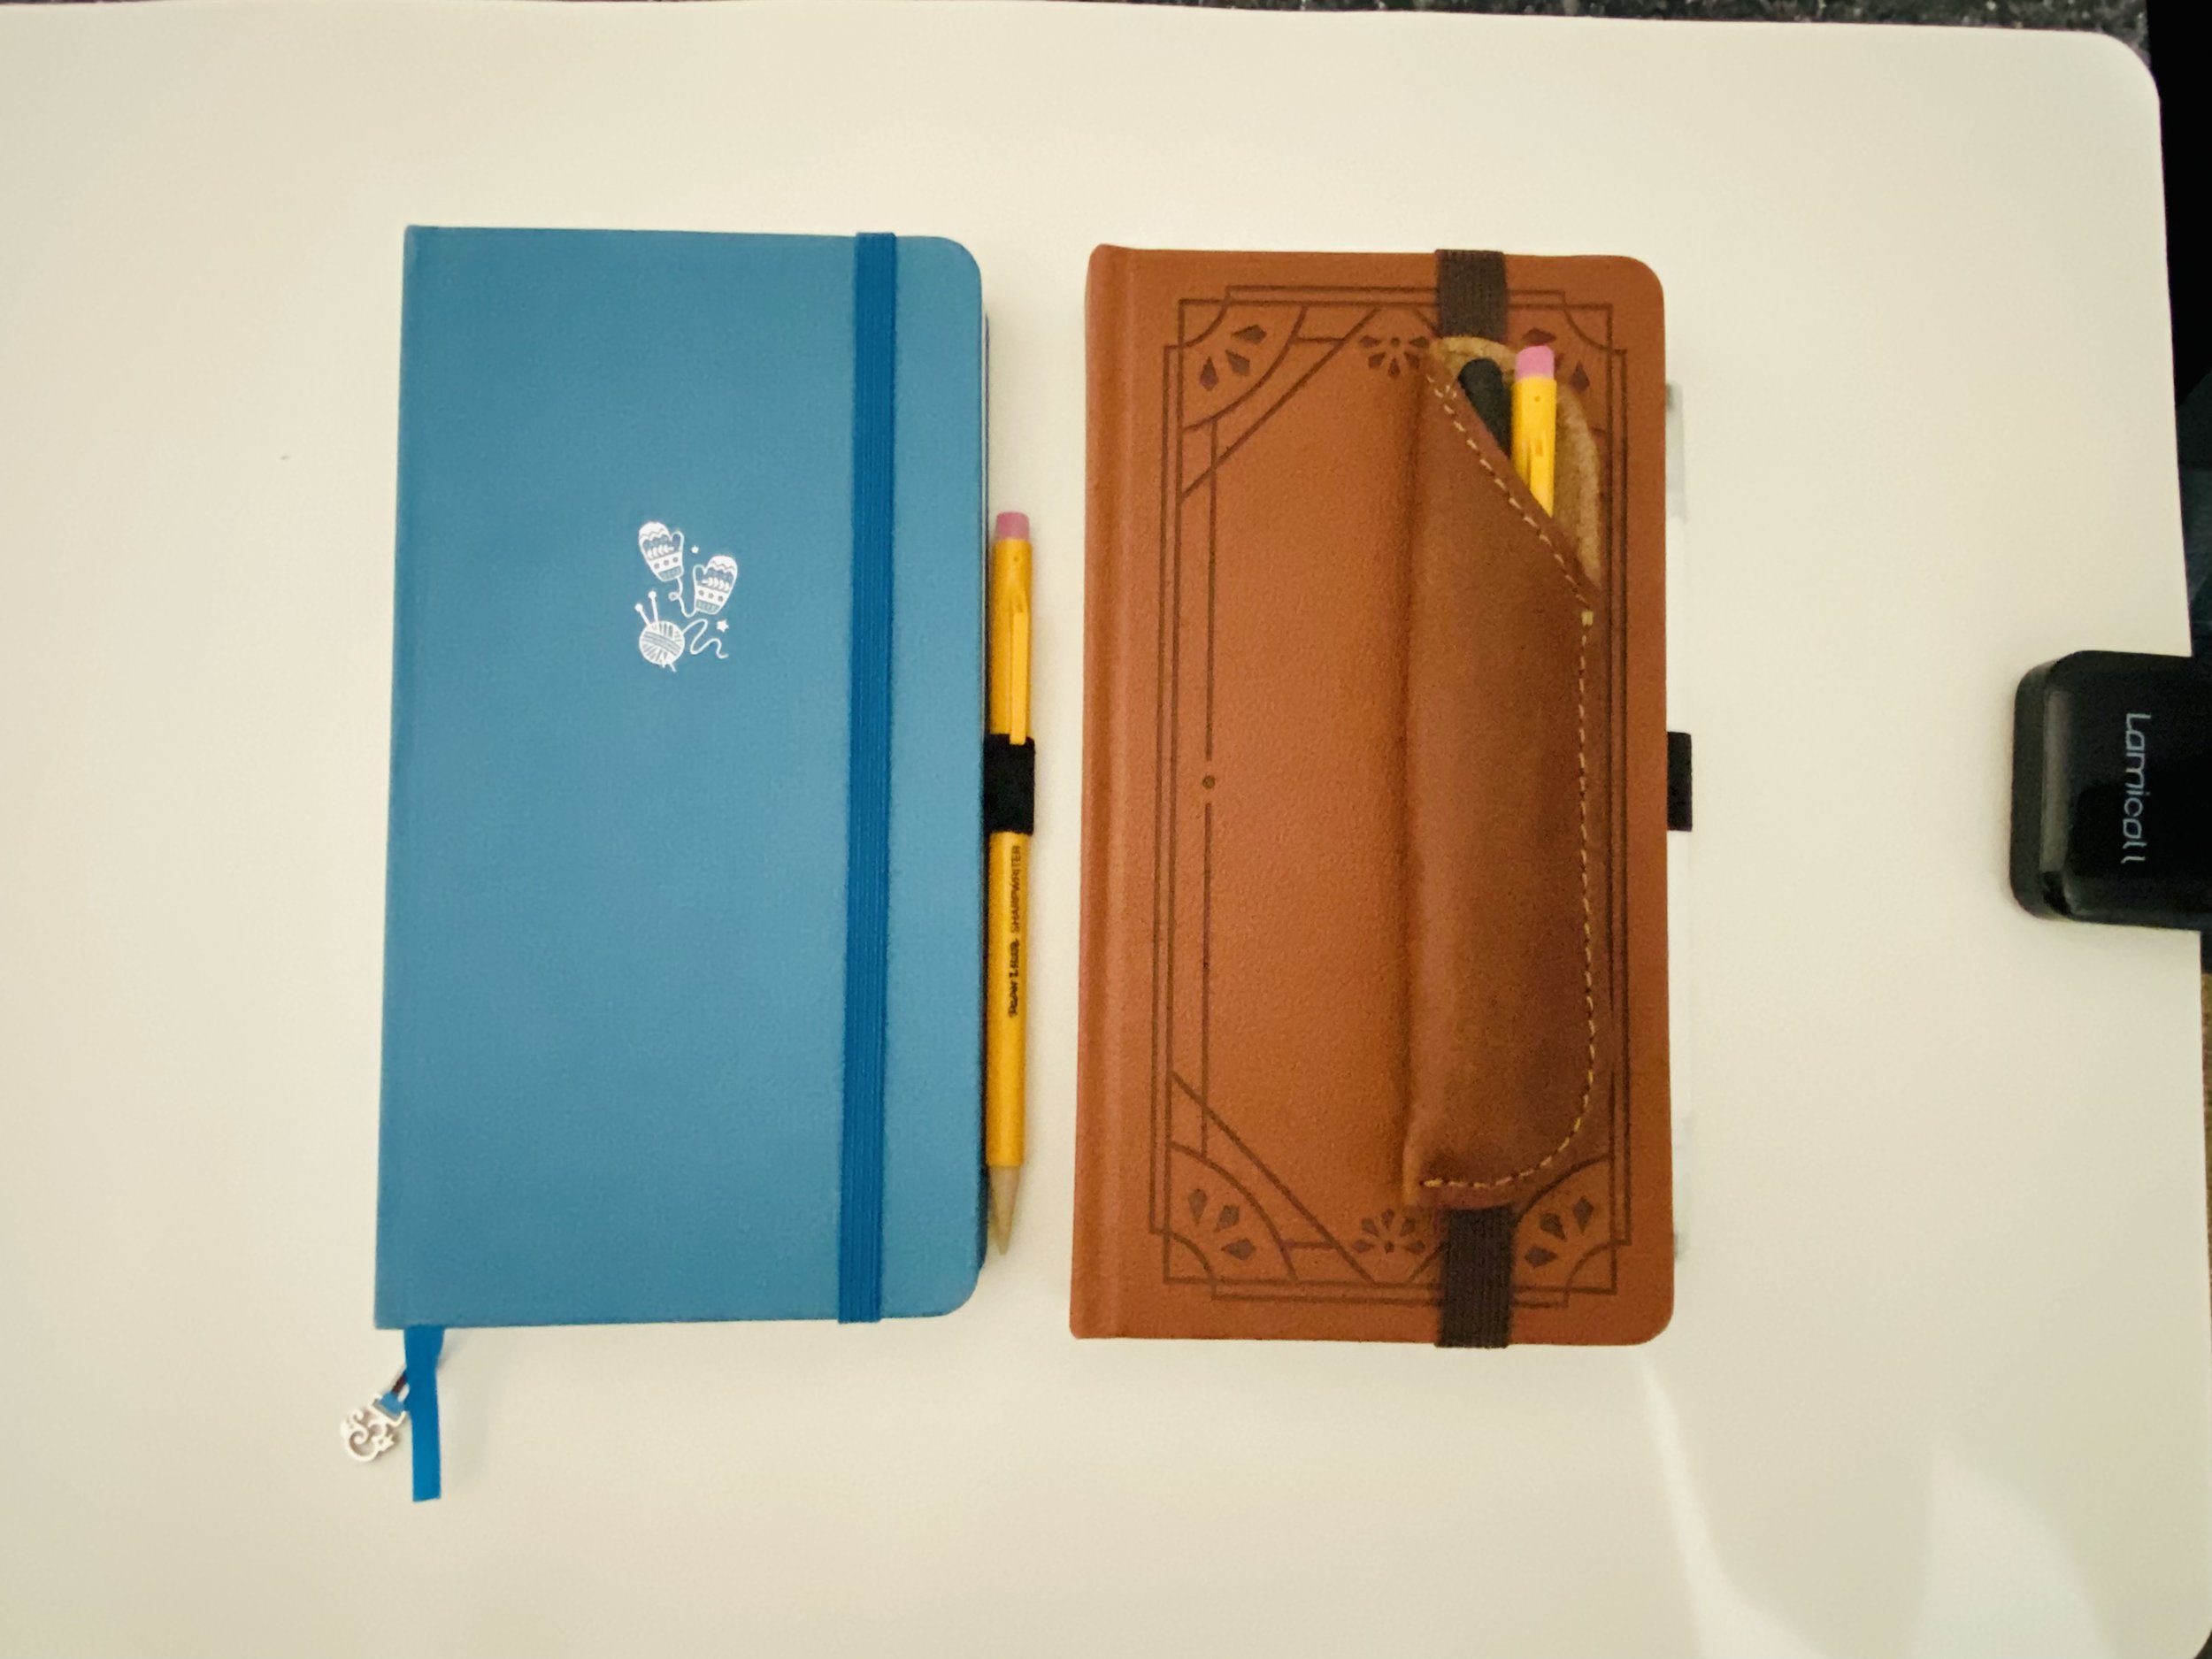
B5 notebook is on the left. Traveler’s notebook is on the right. My Chic Sparrow pen holder in Creme Brulee will move over to my new notebook.
I love the traveler’s notebooks sizes. You get the space of writing on the feel of a page, but it is compact enough to really be able to toss into any bag and take with you on the go. Archer & Olive remains one of the only companies that put out quality TN-size notebooks.
Step 1: Assess Your Current Bullet Journal
Before you begin the migration process, take some time to evaluate your current bullet journal. Assess what sections and collections you have, what pages are left blank, and any ongoing projects or goals you want to carry forward. This step will help you determine what needs to be transferred to the new notebook. I always go through and mark what pages absolutely need to move over into my new book in order to make it more usable.
For this transfer, the ones are moving to my new notebook are:
Monthly layouts (Like a planner)
Future planning (I like to go out at least 6 months)
Things to do and try (We just moved, so I am constantly looking to try new things)
Current projects (Blogging projects and potty training notes)
Future events (We have a family trip coming up within a month, so my packing notes are moving over)
Anything sentimental
Step 2: Choose Your New Notebook
Selecting the right notebook for your bullet journal is crucial. Consider factors like paper quality, size, binding, and whether it meets your specific needs. For me, it was about mobility and weight. Once you've found the perfect notebook, ensure that it has enough pages to accommodate your migration. There is nothing like moving into a new notebook to have to move it again. There are a ton of options for looking at a new notebook. I love Archer & Olive notebooks, but you can use any notebook or journal that fits your needs.
Some things to consider:
Pen loop vs no pen loop
Cover materials (Fabric would annoy me sometimes because of lint and dirt. Vegan leather seems to be way more durable)
Size for writing (B5 had tons of room but got heavy quickly)
Mobility (Will you carry it with you?)
Cover or no cover (See image below)
Has the size worked for you in the past? Why did you ditch it before?

Deciding whether to use the cover stand alone because it is a Vegan Leather cover or use a Chic Sparrow Traveler’s Notebook leather cover. I decided on stand alone.
Comparison of the kinds of covers from Archer & Olive. Fabric cover on the left. Vegan leather cover on the right. Both are the Traveler’s Notebook sizes.
Step 3: Move over important pages first
Start by going through your current journal and see what pages need to move over to make the new journal functional. Some people enjoy carrying around multiple notebooks-I am not one of them. I like my journal to be like a command center for my life. I just need one. You can list key sections and collections you plan to migrate or mark them with washi tape or sticky notes. This will serve as a reference guide throughout the process and make it easier to find specific pages later.

Step 4: Decide on new layouts, themes, and spreads
If you ever wanted to adopt a new style, now is the time to do it! I plan on jumping into my new traveler’s notebook by focusing on the use of daily pages to set my intentions and get my to-do lists out of my head. You can begin the migration process by copying over your future logs and yearly spreads to the new notebook. These sections usually contain events, important dates, and long-term planning that you want to keep track of. Take your time to recreate them accurately in the new journal. Part of the meditation process of journaling is the drawing and setting up part (If you are a pre-drawn planner person, I totally get it).
Some things to consider:
How will you plan?
Move on to migrating your monthly spreads and calendars. Start with the current month and work your way backward, copying over important dates, tasks, appointments, and events. Use a ruler or straight edge to maintain consistency in the layout.
What areas of life do you want to keep focusing on? What will be a new focus?
Next, transfer any collections, trackers, or lists you have in your bullet journal. These could include habit trackers, reading lists, gratitude logs, or anything else you find useful. Make sure to update the index with the new page numbers as you migrate each collection.

New notebook all set!
How will you get creative?
When you switch notebooks or journals, you may also want to switch systems of drawing or coloring. Maybe it is time for new markers, pens, or other journaling accessories. For my move, I switched over my Calliograph marker from Archer & Olive (I just need a straightforward black pen with a brush side and a fine point side) and I kept my ink pen and mechanical pencil. If I need more materials, I am going to throw my notebook into my journaling cover.
Step 5: Review and Reflect
Take a moment to review your migrated bullet journal. Check for any missing pages, incomplete information, or errors that may have occurred during the transfer. Make necessary adjustments or additions to ensure everything is accurate and up to date. The goal is going to be to put your journal on the shelf, so you won’t need to carry it with you anymore. Make sure all information made it into the new notebook.
Step 6: Archive or Repurpose Your Old Journal
Once you're satisfied with the migration, decide what you want to do with your old bullet journal. You may choose to archive it on a shelf as a keepsake, recycle the pages, or repurpose it for other creative endeavors. I like to keep recent journals and go-to supplies onthe top shelf of my reading bookshelf in our little loft area. After awhile, I move journals and notebooks into a storage bin for safekeeping.
Step 7: Customize your new notebook and Make It Your Own
Now that your bullet journal is successfully migrated to the new notebook, take the opportunity to personalize it further. Add decorative elements, color coding, or any other creative touches that make the journal uniquely yours. Migrating your bullet journal from one notebook to another can be a rewarding process, allowing you to carry your progress, goals, and memories with you. By following this step-by-step guide, you can ensure a smooth transition and continue enjoying the benefits of bullet journaling in your new notebook. Remember, the key is to stay organized and make the process your own, so you can create a journal that reflects your style and meets your needs.
Happy writing!


